前言
前一段时间 被TeamViewer折磨得够呛,各种‘检测到商业行为’和‘连接失败,未知原因’,因此决心要找到可以远程操控的替代方案,度娘上看了一圈,对以下两个比较有兴趣:
- frp内网穿透:配置简单,需要一个vps做服务器,所有数据流量都通过vps中转,因此传输速度受到vps网速限制。
- ZeroTier One:配置麻烦点,会在客户端安装虚拟网卡,配置好后组建成局域网,数据流量不用全部经过服务器中转,但是由于要注册官方账号组网,因此服务端并不可控。
本文主要介绍frp的使用方法。
服务端配置
首先需要下载软件,Github地址为 https://github.com/fatedier/frp/releases ,按自己服务端和客户端的操作系统下载对应的包:
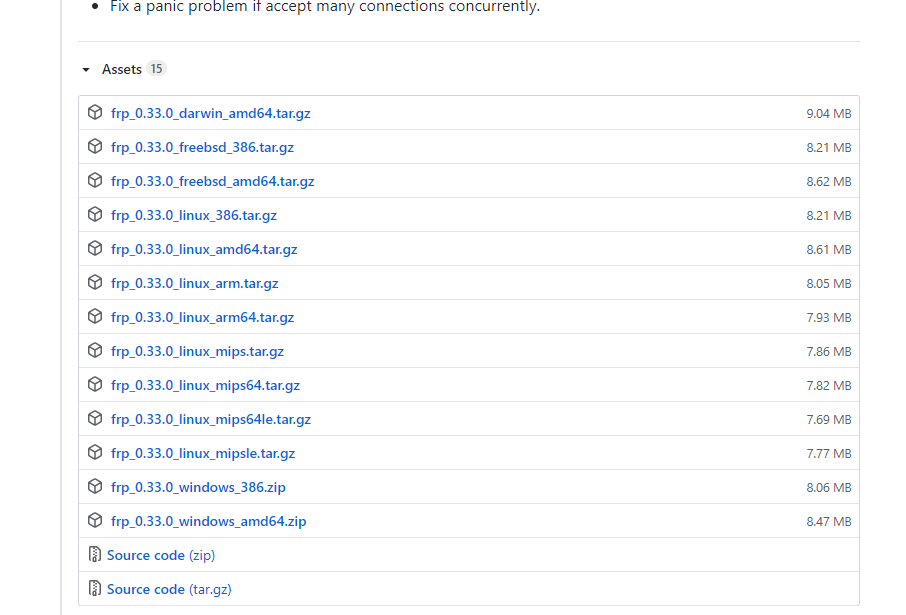
我下载的是windows版本,下载完后解压出来,可以看到有以下几个文件:
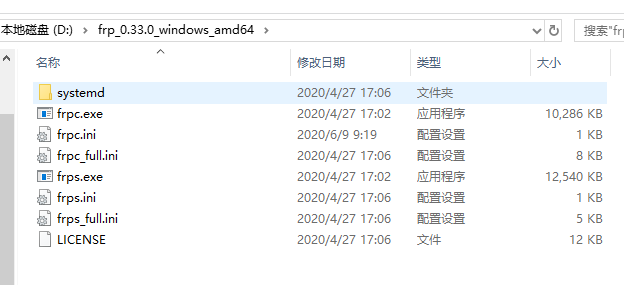
其中frps.exe和frps.ini是服务端的程序和配置文件,frps_full.ini是服务端配置文件示例,我们首先了解下服务端配置文件:
#必要标记,不可删除
[common]

#服务端供使用的IP,0.0.0.0代表任何一个网卡的IP都可以,可以指定成服务器的任一IP
bind_addr = 0.0.0.0
#服务端与客户端通信的端口,客户端要配置成和服务端一样
bind_port = 7000

#UDP通讯端口 以帮助使UDP打洞穿透NAT,可自定义。
bind_udp_port = 7001

# udp port used for kcp protocol, it can be same with 'bind_port'
# if not set, kcp is disabled in frps
##udp协议支持kcp模式。kcp的运行端口,不设置表示禁用。可以与'bind_port'端口一致
kcp_bind_port = 7000

# specify which address proxy will listen for, default value is same with bind_addr
# proxy_bind_addr = 127.0.0.1

#如果要转发http端口,则需要指定http端口
vhost_http_port = 80
vhost_https_port = 443

# 服务端web请求超时时间 s
# vhost_http_timeout = 60

# TcpMuxHttpConnectPort specifies the port that the server listens for TCP
# HTTP CONNECT requests. If the value is 0, the server will not multiplex TCP
# requests on one single port. If it's not - it will listen on this value for
# HTTP CONNECT requests. By default, this value is 0.
# tcpmux_httpconnect_port = 1337

# set dashboard_addr and dashboard_port to view dashboard of frps
# dashboard_addr's default value is same with bind_addr
# dashboard is available only if dashboard_port is set
#服务端web管理界面的IP和端口,0.0.0.0指服务器所有网卡IP都可访问
dashboard_addr = 0.0.0.0
dashboard_port = 7500

# dashboard user and passwd for basic auth protect, if not set, both default value is admin
#服务端web登录账号密码
dashboard_user = admin
dashboard_pwd = admin

# enable_prometheus will export prometheus metrics on {dashboard_addr}:{dashboard_port} in /metrics api.
enable_prometheus = true

# dashboard assets directory(only for debug mode)
# assets_dir = ./static
# console or real logFile path like ./frps.log
#日志存放路径
log_file = ./frps.log

# trace, debug, info, warn, error
#日志级别
log_level = info
#日志保存时间 天
log_max_days = 30

# disable log colors when log_file is console, default is false
disable_log_color = false

# DetailedErrorsToClient defines whether to send the specific error (with debug info) to frpc. By default, this value is true.
detailed_errors_to_client = true

# AuthenticationMethod specifies what authentication method to use authenticate frpc with frps.
# If "token" is specified - token will be read into login message.
# If "oidc" is specified - OIDC (Open ID Connect) token will be issued using OIDC settings. By default, this value is "token".
authentication_method = token

# AuthenticateHeartBeats specifies whether to include authentication token in heartbeats sent to frps. By default, this value is false.
authenticate_heartbeats = false

# AuthenticateNewWorkConns specifies whether to include authentication token in new work connections sent to frps. By default, this value is false.
authenticate_new_work_conns = false

# 链接认证密匙,客户端必须跟服务端一样才能正常转发,必须配置
token = 12345678

# OidcClientId specifies the client ID to use to get a token in OIDC authentication if AuthenticationMethod == "oidc".
# By default, this value is "".
oidc_client_id =

# OidcClientSecret specifies the client secret to use to get a token in OIDC authentication if AuthenticationMethod == "oidc".
# By default, this value is "".
oidc_client_secret =

# OidcAudience specifies the audience of the token in OIDC authentication if AuthenticationMethod == "oidc". By default, this value is "".
oidc_audience =

# OidcTokenEndpointUrl specifies the URL which implements OIDC Token Endpoint.
# It will be used to get an OIDC token if AuthenticationMethod == "oidc". By default, this value is "".
oidc_token_endpoint_url =

# heartbeat configure, it's not recommended to modify the default value
# the default value of heartbeat_timeout is 90
# 客户端与服务端连接心跳检测
# heartbeat_timeout = 90

# 允许frp代理的端口,不设置则所有端口都可以
allow_ports = 2000-3000,3001,3003,4000-50000

# pool_count in each proxy will change to max_pool_count if they exceed the maximum value
#每个frp限制的最大连接池数量
max_pool_count = 5

#每个客户端可代理的端口数上限,设置为0则不限制
max_ports_per_client = 0

# TlsOnly specifies whether to only accept TLS-encrypted connections. By default, the value is false.
tls_only = false

# if subdomain_host is not empty, you can set subdomain when type is http or https in frpc's configure file
# when subdomain is test, the host used by routing is test.frps.com
#自定义二级域名
subdomain_host = frps.com

# if tcp stream multiplexing is used, default is true
#tcp流量复用
tcp_mux = true

# custom 404 page for HTTP requests
# custom_404_page = /path/to/404.html

[plugin.user-manager]
addr = 127.0.0.1:9000
path = /handler
ops = Login

[plugin.port-manager]
addr = 127.0.0.1:9001
path = /handler
ops = NewProxy
此处我们弄一个最简单的配置,进入vps服务器,复制frps.exe和frps.ini文件进去,修改frps.ini文件:
token = 123456
bind_port = 7000
然后使用管理员身份打开cmd,运行以下命令:
D:\frp_0.33.0_windows_amd64\frps.exe -c D:\frp_0.33.0_windows_amd64\frps.ini为了启动方便,我们可以写一个vb文件,达到直接双击即可启动frp的目的,新建一个txt文件,输入以下代码,然后修改后缀为.vbs,保存即可:
Set ws =CreateObject("Wscript.Shell")
    ws.run "cmd /c D:\frp_0.33.0_windows_amd64\frps.exe -c D:\frp_0.33.0_windows_amd64\frps.ini",vbhide
客户端配置
客户端程序是frpc.exe,客户端配置文件时frpc.ini,客户端配置文件示例为frpc_full.ini,同样我们先了解下客户端配置文件常用配置:
[common]
# 与服务端连接令牌,跟服务端保持一致
token = access_token
# 客户端标识
user = nas
#服务端的访问地址,必须是VPS可以连通的IP。
server_addr = 111.222.222.111

#服务端与客户端交互的端口,与服务端保持一致。
server_port = 7000
# 日志记录路径
log_file = ./frpc.log
# 日志记录级别(trace, debug, info, warn, error)
log_level = info
# 日志记录滚动天数
log_max_days = 3
# frpc客户端管理界面
admin_addr = 127.0.0.1
admin_port = 7400
admin_user = admin
admin_passwd = admin
# 连接池
pool_count = 5
# tcp数据流多路复用,默认开启,服务端客户端需要保持一致
tcp_mux = true
# 失败重连
login_fail_exit = true
# 服务端与客户端通信协议,支持tcp\upd
protocol = tcp
# dns服务选用
# dns_server = 8.8.8.8
#客户端向服务端心跳检查间隔与超时时间
heartbeat_interval = 10
heartbeat_timeout = 90
##############以上为客户端服务的公共信息配置区域############

###############具体的穿透服务功能启用(表示你要使用frp的那个功能)##############
[ssh]
#穿透类型
type = tcp
#需穿透服务本地访问地址
local_ip = 127.0.0.1
#需穿透服务本地访问端口
local_port = 22
#是否使用通讯加密,默认false
use_encryption = false
#是否使用通讯压缩,默认false
use_compression = false
#穿透后外网访问端口。
remote_port = 6001

[dns]
type = udp
local_ip = 114.114.114.114
local_port = 53
remote_port = 6002
use_encryption = false
use_compression = false

#http或者https模式主要针对于虚拟主机,访问的取决于frps.ini文件中的vhost_http_port设置
[web01]
type = http
local_ip = 127.0.0.1
local_port = 80
use_encryption = false
use_compression = true
#虚拟主机访问账户密码设置,如果不设置的话。自己通过地址即可访问。
http_user = admin
http_pwd = admin
# if domain for frps is frps.com, then you can access [web01] proxy by URL http://test.frps.com
#如果你的frps域名是yourdomain.com,那么你可以通过web01.yourdomain.com 来访问web01这个穿透服务。
subdomain = web01
#自己定义域名
custom_domains = yourdomain.com
# locations is only available for http type
locations = /,/pic
# http重定向地址
host_header_rewrite = example.com
# http请求文件头
header_X-From-Where = frp

[web02]
type = https
local_ip = 127.0.0.1
local_port = 8000
use_encryption = false
use_compression = false
subdomain = web02
custom_domains = web02.yourdomain.com

[plugin_static_file]
type = tcp
remote_port = 6006
plugin = static_file
plugin_local_path = /var/www/blog
plugin_strip_prefix = static
plugin_http_user = abc
plugin_http_passwd = abc
我们的需求是通过内网穿透访问windows远程桌面,因此在需要被操控的电脑上按如下配置:
[common]
token = 123456
user = 4lRDP
server_addr = X.X.X.X
server_port = 7000

[RDP]
type = tcp
#内网要远程的电脑IP
local_ip = 172.16.11.7
#远程桌面服务端口
local_port = 3389
#服务端端口
remote_port = 7001
此处我们配置的服务端端口是7001,那么vps服务器防火墙要记得开放这个端口。
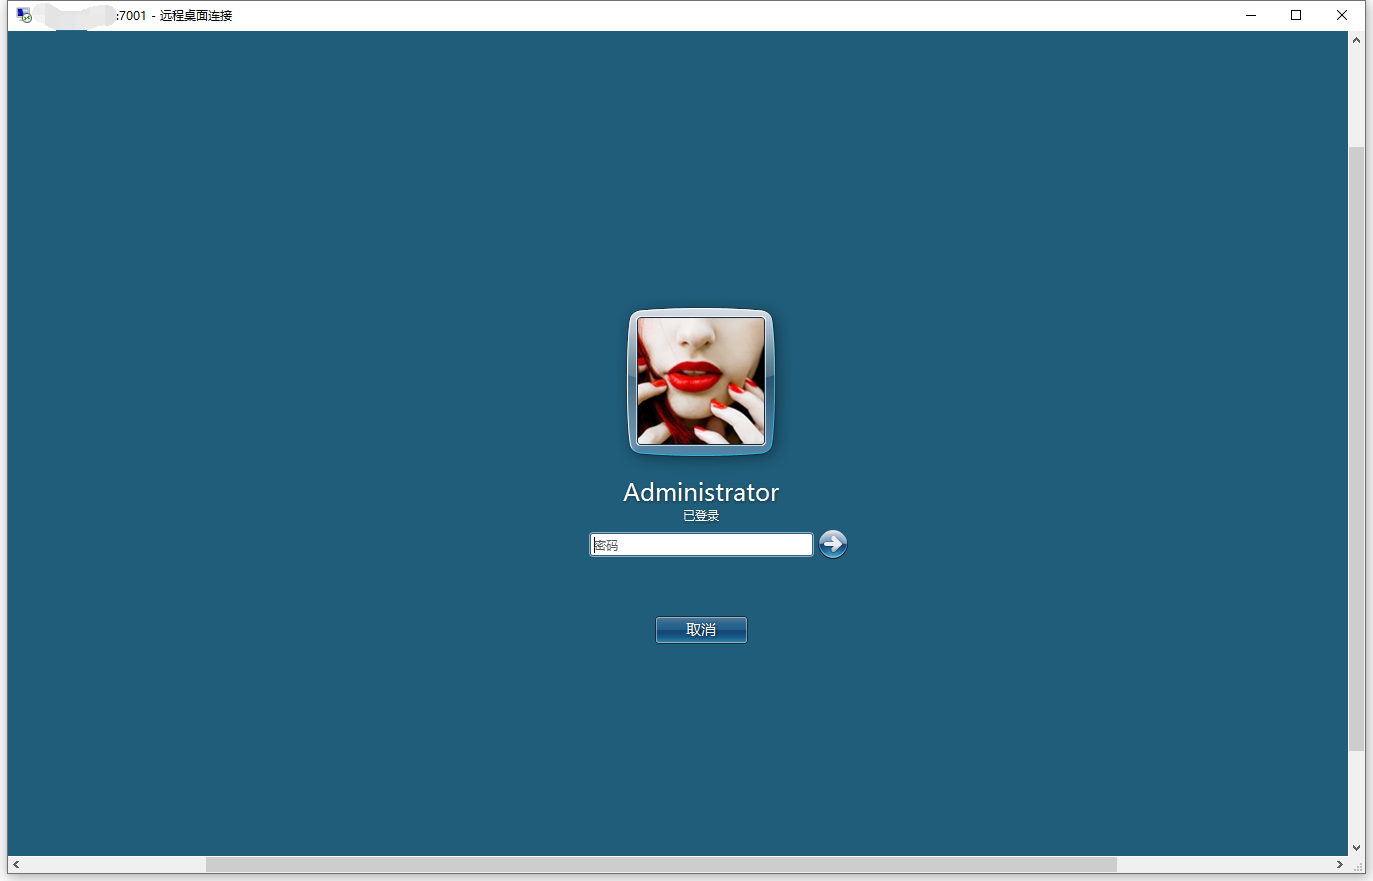
配置完成后,在需要远程控制的电脑上,直接打开windows远程桌面,使用服务器IP和指定端口(X.X.X.X:7002)即可远程桌面链接frp客户端指定的电脑:
高阶应用
stcp代理
处于网络安全的考虑,直接将服务端口暴露到外网并不安全,frp提供了stcp代理的方案,可以在连接之前再加一层校验。
启用stcp服务端配置不需要调整,但是访问端和被访问端都需要有frp客户端和配置,被访问端配置如下:
[common]
token = 123456
user = 4lRDP
server_addr = X.X.X.X
server_port = 7000

[RDP]
#类型调整成stcp
type = stcp
local_ip = 172.16.11.7
local_port = 3389
remote_port = 7001
#增加sk密码
sk=password
访问端配置文件:
[common]
server_addr = X.X.X.X
server_port = 7000

[RDP_visitor]
#类型调整成stcp
type = stcp
#stcp访问者身份
role=visitor
#要访问stcp代理的名字,也就是被访问端中配置的[RDP]
server_name = RDP
#sk密码
sk=password
#绑定本机端口用于访问RDP服务
bind_addr = 127.0.0.1
bin_port = 6000
启动访问端、服务端、被访问端三台机器上的frp后,访问端所在局域网所有电脑都可以通过访问端内网IP 加6000端口访问被访问端电脑。
开机启动
windows
上文已经提及了windows平台下可以使用一个VB文件来快速启动frp,那么我们只需要在windows计划任务中加入这个VB文件的启动,即可实现自动启动,如下图,在计算机管理-系统工具-任务计划程序-任务计划程序库-Microsoft-windows-shell下创建新任务(目录可以自己确定一个):
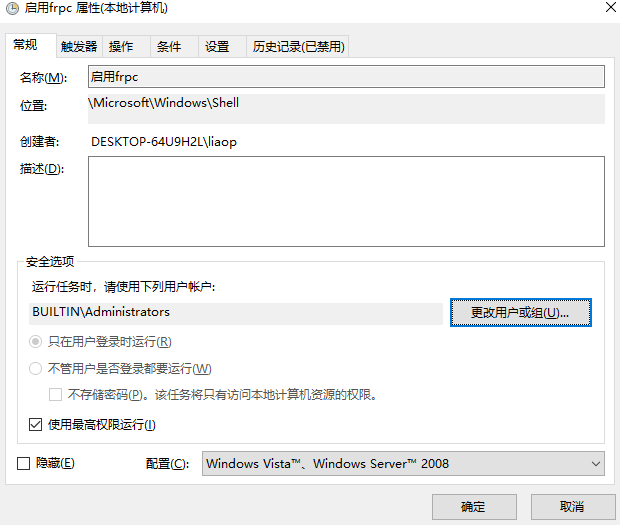
常规:用户选择一个管理员用户,勾选’不管用户是否登陆都要运行‘、‘使用最高权限’:
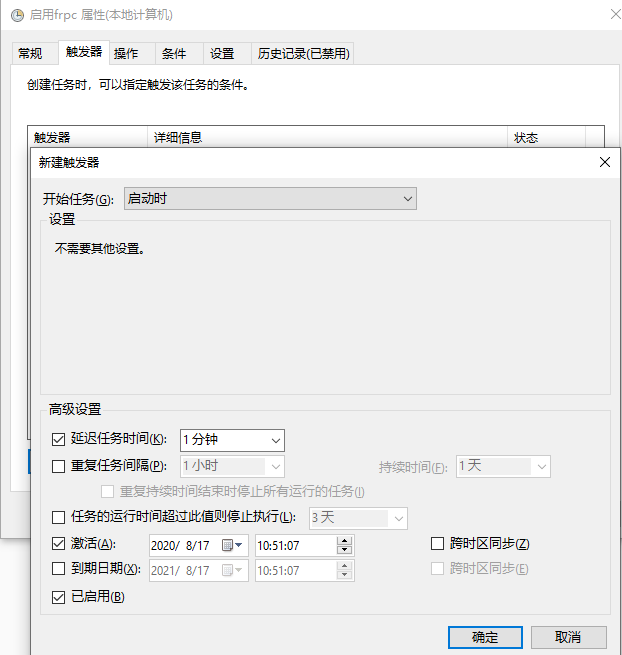
触发器:新增一个计划,开始任务选择‘启动时’,为了防止跟其他启动任务冲突可以选择延迟1分钟,激活选当天,勾选‘已启用’:
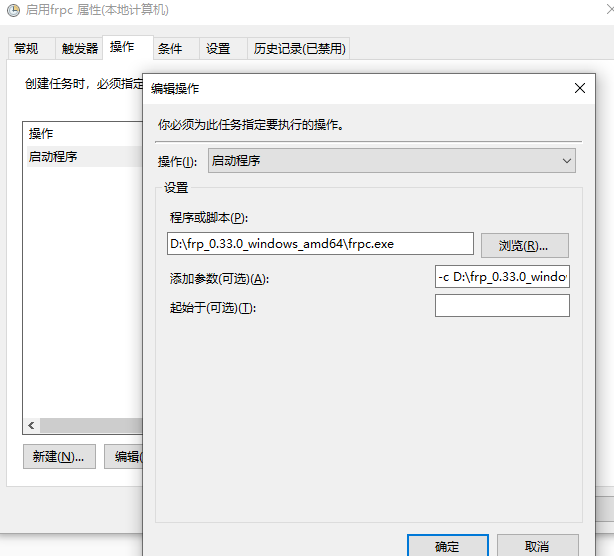
操作:新建操作,操作类型选择启动程序,程序直接填写VB脚本文件的位置即可,也可以不用VB脚本,直接选择frpc.exe,然后启动参数填‘-c frpc.ini带路径全名’:
后面其他配置可以自己看看按需配置。配置完成后每次启动电脑一分钟后就会自动启动frp。
linux
centos自启动有很多种方法,这里我们使用较为简单的一种,直接加到/etc/rc.local里面:
vi /etc/rc.local内容如下:
[root@localhost ~]# cat /etc/rc.local
#!/bin/bash
# THIS FILE IS ADDED FOR COMPATIBILITY PURPOSES
#
# It is highly advisable to create own systemd services or udev rules
# to run scripts during boot instead of using this file.
#
# In contrast to previous versions due to parallel execution during boot
# this script will NOT be run after all other services.
#
# Please note that you must run 'chmod +x /etc/rc.d/rc.local' to ensure
# that this script will be executed during boot.

touch /var/lock/subsys/local
/root/frp/frp_0.33.0_linux_amd64/frpc -c /root/frp/frp_0.33.0_linux_amd64/frpc.ini &
由于frp直接命令执行的话会停留在日志界面,因此我们需要在后面加空格和&。
另外由于centos7将/etc/rc.local文件权限降低了,因此我们还需要将其标记成可执行文件:
chmod +x /etc/rc.local